

Let’s Get It Clear: Measurements in seating – Absolute angles in body measures
In the previous articles we looked at how parts of the body and a seating system are measured in relation to each other, while in this article we look at how these parts are measured in relation to the outside world, and how they can be used to measure individual aspects of specific parts of the body. Doing this in a standardised way is an important aspect that ensures one person’s measurements are consistent with the next person’s.
Measurements of relative angles, as covered in the previous articles in this series, have relevance to positions within the body’s range of motion related to their seated posture, and the relative angles of the seating system to match the relative angles of an optimised body posture.
Within the seating system these relative angles remain unchanged when, for example, the seating system is tilted. The ‘absolute’ measures of the seating system, on the other hand, do alter when the seat is tilted, because absolute measures relate to the outside world, where our references in normal life are gravitational, i.e. to the vertical, and at right angles to the vertical, to the horizontal.
Absolute measures have their value for a supplier who is setting up the individual components of a seating system prior to its delivery, and this we’ll address in a later article. Here, we will address the value of absolute angle measures of the human body. These values are measures of the position in space of the different body lines introduced in Part 1 of this series, referencing the outside world.
For example, for the pelvis, these are a means of having a standardised measure of the degree of pelvic obliquity, pelvic tilt, or pelvic rotation, and a means to measure change either as a result of a seating intervention, or progressive clinical change over time,
Pelvic obliquity
What is a pelvic obliquity? It would be universally agreed that we understand this to be that, from the frontal view, one side of the pelvis is higher than the other. Frequently the term used is that a person has a left (or right) pelvic obliquity, but does that mean that the left is higher or lower than the right, or vice versa? Even if we had an agreed definition, how could we quantify the degree of pelvic obliquity in a standardised way so that we could measure change over time or after a seating intervention?
It was these challenges which, in part, led to the creation of an ISO standard in 20061. This standard is being updated, and the clinical guidance from these updates can be found in a Clinical Advisory Guide (CAG)2. In the standardisation, there’s a basic sets of rules that can be applied to measuring angles of any line of the body in ‘absolute’ terms, and these have been ascribed to ‘Right Hand’ rules.
Right hand rules
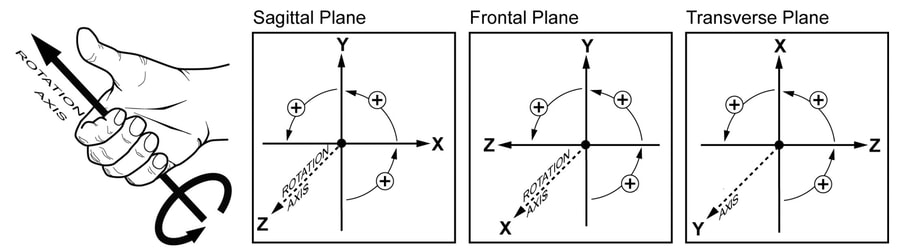
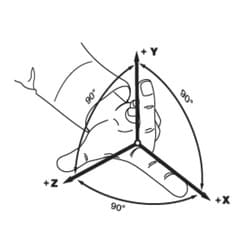
There are two ‘right hand’ rules involved. The first right hand rule relates to the gravitational axes, and is depicted by using the thumb and the first two fingers of the right hand, with each digit at right angles to each other (see Figure 1).
With the body in a 90-90-90 reference position, the half way point between the two hip joints is the zero starting point for this rule. From this point there’s a vertical (y) axis (the middle finger), and two horizontal axes. The first of these (the z axis) goes off to the right (the thumb), and the other (the x axis), at right angles, to the front (the forefinger).
The rules for measuring the direction and amount of rotation come from a second right hand rule. There is a clockwise direction of rotation which is designated as a negative angle, and an anti-clockwise which is a positive angle.
To know which is which, place the thumb of your right hand pointing outwards along the axis in question, and curl your fingers. The fingers point in the positive (anti-clockwise direction) (Figure 2).
Body measures
If working out the angle of a pelvic obliquity, the axis of rotation is the x axis (the one that sticks out at you when you view from the front). Take your thumb of your right hand and point it straight away from you along this axis, and see the direction in which your fingers curl.
If the left side of the pelvis is lower than the right, then the rotation will follow the finger curl, and will be anticlockwise from the horizontal reference: therefore the obliquity can be measured as a finite number of plus degrees from the horizontal – see Example and Figure 3.
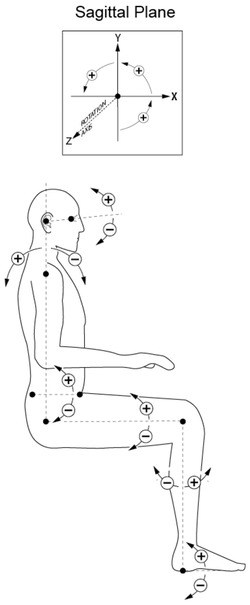
The same rule applies not only to the frontal view described in the paragraph above, but also to angles from the side or sagittal view, or from above or transverse view.
From the sagittal view we can measure the degree of pelvic tilt. The thumb will stick out along the z axis, and the fingers will curl into a positive angle when the pelvis moves into a posterior tilt (Figure 4).
For measures of rotated body lines, from above the thumb goes straight up the vertical y axis, and the finger curl will give a positive angle if the pelvis is rotated with the right ASIS forward and the left one backwards.
If both legs are abducted away from the midline, the left leg will be abducted in a positive direction, and the right leg in a negative direction.
These two right hand rules therefore give us a standardised means to measure the position of different parts of the body, using the body part lines described in Part 1 of this series, and measuring them against the gravitational axes of the outside world.
Example
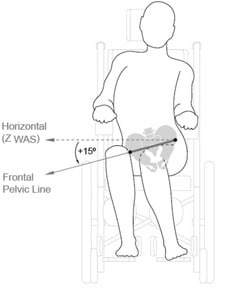
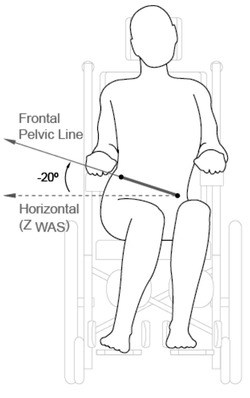
FRONTAL PELVIC ANGLE
Type of Angle: Absolute body segment angle
Description: The angle of orientation of the pelvis with respect to the horizontal, viewed from the front.
Landmarks used:
- Right ASIS
- Left ASIS
Lines used to form angle:
- Horizontal
- Frontal pelvic line
Angle definition: Degree of rotation from the horizontal to the frontal pelvic line, viewed from the front and projected to the frontal plane.
Purpose: To document the existing or desired orientation of the pelvis in the frontal plane
Clinical Relevance: This angular measure is used to quantify what is also referred to as a ‘pelvic obliquity’. This measure is important clinically because asymmetries of the pelvis in this plane can have a significant affect on a seated person’s upper body posture, comfort, and function as well as risk of skin breakdown from differential loading of the ischials, buttocks, and thighs.
Sample Procedure
1. Locate the landmarks and frontal pelvic line
Palpate the right and left ASIS’s, and locate the line between them which is the frontal pelvic line.
- Right ASIS – the most anterior inferior prominence of the right anterior superior iliac spine projected to the anterior surface of the body.
- Left ASIS – the most anterior inferior prominence of the left anterior superior iliac spine projected to the anterior surface of the body.
2. Measure angle
a) Using an inclinometer or angle finder: Place the horizontal straight edge of the inclinometer or angle finder along or parallel to the frontal pelvic line, and read the angle value.
b) Using a goniometer: Standing in front of person, place the goniometer pivot centre over the left ASIS. Align the stationary arm with the horizontal pointing towards the person’s right side. Align the moveable arm along or parallel to the frontal pelvic line. Read the angle value.
Note: You can also place the goniometer pivot centre over the right ASIS and point the arms of the goniometer to the person’s left side. The angle value will be the same.
3. Determine positive or negative value based on the direction of rotation away from the horizontal reference line
- If the right ASIS is lower than the left ASIS, indicating a anticlockwise rotation as viewed from the front, the value is positive.
- If the right ASIS is higher than the left ASIS, indicating a clockwise rotation as viewed from the front of the person, the value is negative.
Considerations
- If the frontal pelvic angle is not 0 degrees, this indicates an asymmetry of the pelvis in this plane, and this measure is an indication of the magnitude of the asymmetry. This information can help in the appropriate prescription of a seat support surface which is intended to accommodate the asymmetry.
- This measure is also important in that it provides an indicator of the differential loading likely to be occurring through the ischial tuberosities, buttocks, and thighs.
- When taken both before and after seating intervention, this measure could provide an objective measure of postural change.
- This measure will be affected by any change in the seat support frontal angle, such as that which may occur in a wheelchair with a lateral tilt adjustment.
References
- ISO 16840-1:2006 Wheelchair Seating, Part 1 – Vocabulary, reference axis convention and measures for body posture and postural support surfaces
- Waugh, K and Crane, B (2013) A clinical application guide to standardized wheelchair seating measures of the body and seating support surfaces. Accessible as BPG3 from https://www.pmguk.co.uk/resources/best-practice-guidelines/bpg-archive
Further items can be found at www.beshealthcare.net. If you are interested in receiving further information on the topic, please contact  barend@beshealthcare.net.
Dr Barend ter Haar has been involved in seating and mobility for over 30 years, including lecturing internationally and developing international seating standards.